Notes, Setup and How-to's about FPGAs Development tools and Simulators
Last Updated: October 30, 2018 by Pepe Sandoval
If you find the information in this page useful and want to show your support, you can make a donation
Use PayPal
This will help me to create more stuff and fix the existent content... or probably your money will be used to buy beer
.tar
and extract it. Make sure to select the right version and edition for you.bat
file for your edition for example setup.bat
for lite edition, this will start the installation wizardUse Download manager tool, direct download may result in a corrupted download that could cause problems during installation
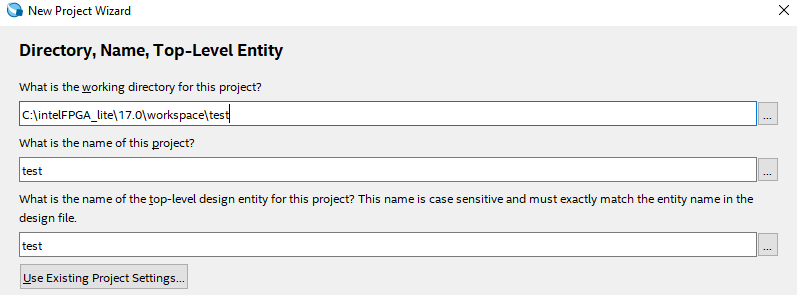
.qpf
will be stored so if you don't create a directory or give a path the files will be stored exactly in that path
.v
, .sv
source files or as a library (path to .v
and .sv
files) and IP modules as .qip
files)/src
dir. created in project folder or all the sources directly in the project..v
/.sv
file with the same name of the top-level name give in step 2 and add it to the project. For this you can:v
/.sv
a file in the project directory with the module's code (module name must be the same as top-level) and add it to the project with Project -> Add/Remove Files In Project...General ModelSim Considerations:
timescale 1ns/1ns
$stop
directive E.g. $display($time, "<< Simulation Complete >>"); $stop;
For Standalone ModelSim you can download the .exe
from the Download Center for FPGAs,
you don't need to download and install other tools, only select the ModelSim-Intel FPGA Edition (includes Starter Edition)
.v
/.sv
files, your module to test and testbench files. E.g. Counter.sv
and Counter_TB.sv
ModelSimTest
or Counter
D:/ModelSim/ModelSimTest
A window will show up click on Add Existing File, select your .v
/.sv
files and click OK
Compile files by going to Compile -> Compile All or right-click and Compile All
In the "Library" Tab expand the work library right-click on your testbench module name (E.g. Counter_TB
) and select Simulate
Add signals to wave (right-click -> Add to -> Wave) and then click on Simulate -> Run -> Run -All
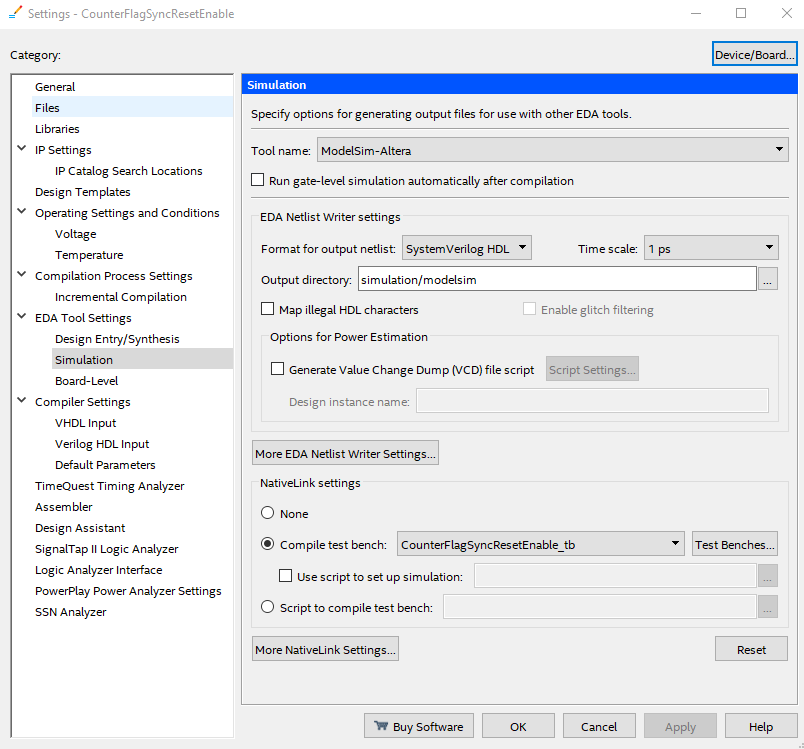
C:\intelFPGA_lite\17.0\modelsim_ase\win32aloem
CounterFlagSyncResetEnable_tb.v
and click OKSystemVerilog/Verilog
None
Icarus Verilog 0.9.7
and check Open EPWave after run optionAdd your files in the testbench.sv
and design.sv
sections. For example:
design.sv:
`default_nettype none
module Register
#(
parameter Word_Length = 8
)
(
input clk,
input reset,
input [Word_Length-1:0] Data,
output [Word_Length-1:0] Q
);
reg [Word_Length-1:0] Q_reg;
always@(posedge clk or negedge reset) begin
if (reset == 1'b0)
Q_reg <= 0;
else
Q_reg <= Data;
end
assign Q = Q_reg;
endmodule
testbench.sv:
`default_nettype none
module tb;
localparam nbits = 16;
reg [nbits-1:0] d;
reg clk, rst;
wire [nbits-1:0] out;
Register #(
.Word_Length(nbits)
) dut(
.clk(clk),
.reset(rst),
.Data(d),
.Q(out)
);
initial
begin
$dumpfile("dump.vcd");
$dumpvars(0, dut);
clk = 0; rst = 1; d = 16'hAAAA;
#1 rst = 0; #3 rst = 1;
#4 d = 16'hBBBB; #4 d = 16'hCCCC;
#4 $finish;
end
always
begin
#1 clk<=~clk;
end
endmodule
Save your design and Run it
EDA Playground does NOT support
SystemVerilog
for simulation
If you find the information in this page useful and want to show your support, you can make a donation
Use PayPal
This will help me to create more stuff and fix the existent content... or probably your money will be used to buy beer