Git Notes
Disclaimer
- The notes and commands documented here are just personal notes that I use for quick reference, this means they can be wrong, unclear and confusing so they are NOT a reliable NOR an official source of information. I strongly suggest you to use the official git documentation and never completely rely on what's written here
- Please review the disclaimer of use and contents in our Terms and Conditions page for information about the contents in this page
What is git
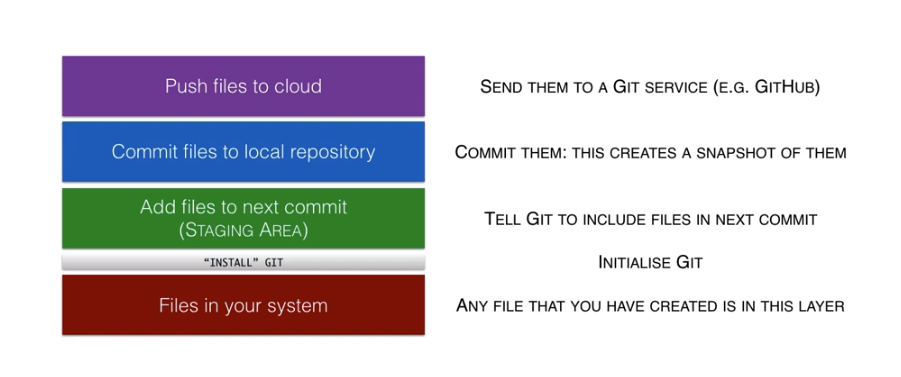
git is a version control program that can be described as a a set of layers and each layer has a function. The function is dependent on the layer and all you do with git is you move files between these layers (layers are all stored inside the .git folder). In simple words it's a way of storing snapshots
You can fully operate with only local repository but is common to have a remote repository that is hosted by a service (GitHub, Bitbucket, etc)
Git Basic Config
Download Git on windows
Download and install git for windows. Download link
Click on Downloads for Windows button to get the executable (.exe file) and run it. Recommended Installation options:
- Use Git from Git Bash Only
- Use OpenSSH
- Checkout as-is, commit Unix-style line endings
- Use Windows default console window
- Everything else leave as it is (Just click Next)
One of the first thing you NEED to do after you install git is to configure your username and email.
git config --global user.name "FirstName LastName"git config --global user.email example@email.comgit config --list
Personalize command prompt
- Edit
.bashrc, modify PS1 variable:
export PS1="${debian_chroot:+($debian_chroot)}\[\033[01;32m\]\u@\h\[\033[00m\]:\[\033[01;34m\]\w\[\033[00m\]\$(__git_ps1 '(%s)')\$ "PS1="${debian_chroot:+($debian_chroot)}\u@\h:\w\$(__git_ps1 '(%s)')\$ "
git config --global core.autocrlf inputgit config --global diff.submodule log to avoid adding --submodule to git diff
If you do not configure the editor whenever the editor is needed git by default will use vim. To configure editor:
git config --global core.editor "'C:\Program Files (x86)\Notepad++\notepad++.exe'"
To configure the diff and merge tools you will need to install a differential tool like p4merge and give the path to where it was installed so git can launch it
git config --global merge.tool p4mergegit config --global mergetool.p4merge.path C:/Program\ Files/Perforce/p4merge.exegit config --global --add mergetool.prompt falsegit config --global diff.tool p4mergegit config --global difftool.p4merge.path C:/Program\ Files/Perforce/p4merge.exegit config --global --add difftool.prompt false
The .gitignore file [optional]
The .gitignore file is the file that contains files and folders that will be ignored by Git
Creating a .gitignore
On the folder of the repo create a file called .gitignore
Edit the .gitignore file and add any rule to ignore. For example:
 *.pdf
 *.doc
 *.temp
 folderInRepo/folder
 ...
stage the .gitignore file, make commit and push it as any normal change
git add .gitignoregit commit -m "message" .gitignoregit push origin <name_of_branch>
Git Basics
- Version Control System (VCS): Its a system that allows to track or manage changes to files; it records changes to files over time so that you can recall specific versions later. These files can be: documents, source files, images, etc.
- Git is Version Control System (VCS) tool
- Repo/Repository: it is just a folder which uses git to track changes of the files it contains
- Git server or remote server: usually an external server that stores the git repo
- HEAD: A pointer that refers to where you currently are in the repository (in which commit you are)
Clone
Cloning/clone in git means copying a git repo to the system where you will be working. In others word it creates a local copy of the repo that is stored on the git server (external server). Examples
git clone <url-to-repo>git clone https://github.com/phacility/arcanist.gitgit clone git@bitbucket.org:jose1791/jms-sandbox.git
Status
git status: command that gives you the current status of your LOCAL repo this means if you have changes in a file or if you have commits that you have not already push to the git server, etc..
Fetch / Pull
Fetching and pulling are used for the same purpose which is updating your local copy of the repo. You use to to get the latest changes that are stored on the repo stored on the git server
- Fetch: Get the changes from the server but it doesn't try to integrate the changes into your local repo. this means it does not modify your local files.
- Pull: Get the changes from the server and tries to integrate the changes into your local repo. this means it will attempt to modify your local files.
Stage / Staging
On git you stage files which means you are preparing them for a commit
- stage files:
git add <path_to_file>
- unstage files:
git reset HEAD <path_to_file>
Commit
- Making a commit means creating a local "checkpoint" (saving your work locally), so you can go back to this point if something goes wrong.
- A commit takes all the files that are staged and ONLY those to create a "checkpoint"
- Your commits (saves) are done LOCALLY and only saved in your local repo, if you commit N-times and your hard drive crashes you lose your work, you must push it order to backup your changes in the origin (usually a server)
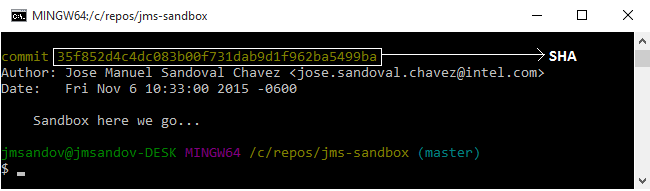
- Every commit can be uniquely identified in a repo by an alphanumeric ID called SHA
Amend
When you already did a commit a forget some changes or forget to add a file, made a mistake on the commit message etc. you can amend your commit
If you forget to add a file, stage it and then use amend
  git add <forgotten_file>
  git commit --amend -C HEAD
If you want to change the commit message or add extra changes to a file that its already part of the commit, stage the file and use one of the following commands both will include your changes on the commit
git commit --amend -m "New message here": Also updates commit messagegit commit --amend: Edit commit message on your default editor
If you want to change the author of a commit that you haven't pushed
git commit --amend --author="New Author Name <email@address.com>"
Update origin
- IF you want to change the origin from which you pull changes you can use the
git remote set-url origin command:
- git remote set-url origin https://<user>@gitlab.developtools.com/<path_to_repo>/<repo_name>.git
- git remote set-url origin ssh://gitlab.developtools.com/<path_to_repo>/<repo_name>.git
Stage and commit
This will stage all the tracked files that are modified and commit them using the provided message, this will not add untracked files
git commit -am "Commit Message here"
Push
On git when you push it sends your changes to the remote server. Its used to "publish" your changes so other people can see them. Once you do this your changes will be visible to all the people who have access to the repo
git push origin <name_of_branch>- Examples:
git push origin mastergit push origin my_development_branch
Logs and History
git log: command that gives you a list of the latest commit you have in your LOCAL repo. Usually used to know in which commit you are. Hit q to exit log viewgit log -p: show git log and all the file changes of each commit changesgit log --stat --summary: show commits log info with summary of changes of each modified filegit log -p -- <path/to/file>: history of changes in filegit log --stat --summary <path/to/file>: check who last modified a filegit grep <regexp> $(git rev-list --all): To search for commit content (actual lines of source)
Merging
You do this when you have a branch and want to integrate/update the changes that are on another branch to yours
- Checkout to both branches and get the latest changes on both
git checkout <branch_source>git pullgit checkout <branch_destination>git pull
Make sure you are on the branch that needs to integrate changes from another branch
git checkout <branch_destination>
Do the merge, on the merge command use the name of the branch that will be integrated
git merge origin/<branch_source>
Merge Conflicts [scenario]
- After doing the merge if there are conflicts you will enter into merge mode (
<branch> | MERGING)
- Execute git mergetool (a merge tool must be set up) and solve the conflicts
- You can hit a git status to verify that the files with conflicts are staged ready to be committed
- Do a commit (usually stating that a merge was performed)
- Now you can push your changes
- If everything goes haywire you can always do a
git merge --abort
Attempting to push a without having the latest changes [scenario]
- You usually commit your changes to your local copy.
- When you try to push you get an error because you don't have changes that are already on the server
- You fetch the new changes
git fetch origin or git fetch
- You can do a:
git merge origin/<name_of_branch> merge your changes
- You can do a:
git rebase origin/<name_of_branch> to put your job on top
- If there is conflict you enter into merge mode (
<branch> | MERGING)
- Execute git mergetool (a merge tool must be set up) and solve the conflicts
- You can hit a git status to verify that the files with conflicts are staged ready to be committed
- Do a commit (usually stating that a merge was performed)
- Now you can push your changes
- If everything goes haywire you can always do a
git merge --abort
Branching
Creating a branch and pushing to it
- Create a branch locally and checkout to it
git branch <my_branch_name_here>git checkout <my_branch_name_here>
- Stage files, do commit
git add <path_to_files_here>git commit –m "message here"
- Create a new branch on server and Push
git push --set-upstream origin <my_branch_name_here>
Alternatively we can manually create the branch on the git server first and then push to it, use:
git branch --set-upstream-to=origin/<my_branch_name_here> <my_branch_name_here> or git branch --set-upstream <my_branch_name_here> origin/<my_branch_name_here>
then git push origin <my_branch_name_here>
Creating a branch and commit unstaged changes
- if you are on a branch, make changes on files and then you want to create a branch and commit those changes to a new branch you only have to do a
git checkout -b <branch_name> to create the new branch and change to it and then commit and push on that branch normally you will see that your changes are still there but you will be on your new branch
Delete a branch
To delete a branch locally and on the git server do:
git branch -D <my_branch_name_here>git push origin : <my_branch_name_here>
Other useful branching
Show all branches information
Show local branches information
Create branch and checkout to it
git checkout -b <branch-name>
Checkout/Reset/Restore
If we ever make mistakes or the changes we did on our files didn't work out or if for any other reason we want to undo changes, return to a previous commit, return the repo to a previous state/status we can use git reset and git checkout which basically are used when we are in the following situation:
"Damn it, Morty! Looks like we screwed everything up, WE GOTTA GO BACK!"
Checkout
Checking out changes the current status of your repo to be in a detached temporary branch.
Used to undo local changes that have NOT been committed NOR staged
git checkout <path_to_file>
Use to quickly go back to a previous commit,
git checkout <commit-sha-id>
Reset
Reset returns the tracked files of your repo to exactly how they were and the status of your repo is changed as if you were on that commit and haven't update your repo
Use to go back to the state of a certain number of commits (n)
git reset -–hard HEAD~<n>
Use to go back to the state of a certain commit
git reset -–hard <commit-sha-id>
diff
show the current differences
git diff --cached git diff <branch>:<path_to_folder> <branch>:<path_to_folder>
If new files are not tracked or not show in git diff you can stage them and use the --cached option
git add <files_for_diff>git diff --cached
Diff commits
git diff <prev_commit> <more_recent_commit>
Diff branches
git diff <branch_1> <branch_2>- Example:
git diff master dev_branch
Git diff not tracked files
git diff --no-index <path_file_1> <path_file_2>git diff --color-words --no-index <path_file_1> <path_file_2>
Creating and Applying a patch
To create a patch you just need to redirect the output of the diff command to a file and use the --patch option. For example
git diff --patch > <path_to_patch_here>/<name_of_patch>.diff
By default the diff does not include the lines above and below the change to include the full context the --no-prefix -U1000 option needs to be added. For Example:
git diff --patch --no-prefix -U1000 > <path_to_patch_here>/<name_of_patch>.diffgit diff --patch --no-prefix -U1000 master <dev_branch> > <path_to_patch_here>/<name_of_patch>.diff
To apply a patch we usually use the options to ignore white spaces and spaces differences
git apply --ignore-space-change --ignore-whitespace <path_to_patch_here>/<name_of_patch>.diff
The --reject option is used to apply only the changes that can be applied without conflicts and creates a file with the conflicts found
git apply --ignore-space-change --ignore-whitespace --reject <path_to_patch_here>/<name_of_patch>.diff
Stash
This is used to make a little "stash" of file(s); like a bundle of changes that you want to save. You don't want to commit but also you don't want to lose them
git stashgit stash listgit stash apply
Clean
To clean a repo means remove/delete files that are not tracked by git
Revert
To revert the changes made by a commit that is either just local or has already been pushed to a remote branch
git revert <commit-sha-id>
If there are no conflicts with other commits, this command will automatically create a new commit that reverts the changes made by the commit passed as parameter so you can push this in case you want to revert the changes that are already in the remote branch. If there are conflicts git will enter into reverting state (<branch> | REVERTING) so you'll have to resolve the conflicts and and create a commit you can use git mergetool command like in Merge Conflicts [scenario]
Tagging
Show tags in a branch
git tag -n -l git tag -l --columnsgit show-ref --tags -d
grep works well with these commands
Creating tags
- Annotated: Contain the tagger name, email, and date; have a tagging message; and can be signed and verified with GNU Privacy Guard (GPG)
git tag -a <tag-name-here> -m "<tag message here>"
- Example:
git tag -a v1.0 -m "Project Version 1.0"
- tag a specific commit:
git tag -a <tag-name-here> <sha-commit-here>
- Lightweight: it’s just like a pointer to a specific commit.
Pushing tags
git push origin <tag-name-here>- Example:
git push origin v1.0
By default, the git push command doesn’t transfer tags to remote servers. You will have to explicitly push tags to a shared server after you have created them
Creating a new repo
This process is used only when you want to create a new repo and NOT work from an already created one, in that case you only need to clone a repo since somebody else already did this
Create a folder with the name you want to give your repo and add files to it
Change to the created directory and execute git init
Create a project on a git host service like Bitbucket to get the origin url and configure it using the git remote add origin <url> command
Add files to your repo, do a commit and do a push all
 mkdir my-repo
 cd my-repo
 git init
 git remote add origin https://jose1791@bitbucket.org/jose1791/my-repo.git
 echo "my-repo readme" > readme.md
 git add readme.md
 git commit -m "My first commit"
 git push -u origin --all
Git Submodules
- For first time clone repo with submodlues on that repo do a
git submodule update --init --recursive
Creating a submodule
- within a git repo do:
git submodule add <git_repo_url>
- A
.gitmodules file and a local subdirectory are created of the submodule:
- The
.gitmodules stores the mapping between the project’s URLs
- When you are not inside a submodule directory Git sees it as a submodule and doesn’t track its contents, it sees it as a particular commit from that repo.
- Commit and push these new changes
git commit -m "Added new module"git push origin master
Cloning a repo with submodules
- clone main repo:
git clone <main_repo_url>
- change directory into the submodule dir. (which should be empty) and do:
git submodule update --init --recursive
Updating submodules
To pull the latest from git submodules: git submodule update --remote or git submodule update --remote <submodule_repo_name> to update only a specific submodule
- This will only pull form the submodule, you will then have to commit and push this changes on the main repo
- This assumes pulling from master branch but you can change this for you or for everyone using the repo
- for you (locally):
git config submodule.<submodule_repo_name>.branch <submodule_branch_name_here>
- for everyone (modify
.gitmodules): git config -f .gitmodules submodule.<submodule_repo_name>.branch <submodule_branch_name_here>
SSH
Enable ssh-dss
- Add the following line to the
~/.ssh/config file (you may need to create one if it doesn't exists): HostkeyAlgorithms +ssh-dss
- Restrict access permissions:
chmod 600 ~/.ssh/config
Review: git review / git-review
Extra command integrated as part of a tool to perform reviews, installation can varu depending of the tool used for reviews like gerrit, confluence, gitlab, etc.
- Run git review setup
git review -s
- Submit review, don't rebase changes:
git review -R
- Download review/patch changes indicated by Change-Id:
git review -d <Change-Id>
TODO
- revert a commit and push again
- I pushed a commit then I went back to a previous commit using git reset did some changes and now I finally have a better version of my code how do I force to have that on the remote repo