atom
- Download .deb file from Atom page
- Install the package:
sudo dpkg -i ~/Downloads/atom-amd64.deb
- Modify
keymap file
'.editor':
    'shift-ctrl-i': 'window:toggle-invisibles
p4merge
- Download p4merge .tgz from page
- Uncompress and untar it:
sudo tar --no-same-owner --extract --ungzip --file ~/Downloads/p4v.tgz --directory /opt
- Create symbolic link:
sudo ln --symbolic /opt/p4v-.../bin/p4merge /usr/bin/p4merge
The ... symbolize the p4v version, use the appropriate one.
git
- Install git:
- In
~/.gitconfig add:
[user]
    email = j_sandoval_chavez@hotmail.com
    name = Jose Manuel Sandoval Chavez
[merge]
    tool = p4merge
[mergetool]
    prompt = false
[diff]
    tool = p4merge
[difftool]
    prompt = false
[core]
    editor = atom --wait
g++
- Install g++:
- Install latest version or specific version
sudo add-apt-repository ppa:ubuntu-toolchain-r/testsudo apt-get updatesudo apt-get install gcc-5 g++-5
pandoc
- Install pandoc using
apt-get
sudo apt-get install pandoc
- Install pandoc using
.deb package
wget https://github.com/jgm/pandoc/releases/download/1.17.2/pandoc-1.17.2-1-amd64.debsudo dpkg -i pandoc-1.17.2-1-amd64.deb
- Test
pandoc --standalone -f markdown_github -t html md_input.md -o html_output.html
Java JDK
- java open jdk
- Add repo and update
sudo add-apt-repository ppa:openjdk-r/ppasudo apt-get update
- Install java using
openjdk-<ver_num>-jdk format. Example:
sudo apt-get install openjdk-8-jdk
- java open jdk windows
- go to Java SE Downloads page
- search in google java jdk download link
- Look for JDK download button/option
- It will take you to a page to select the type of OS to download the specific JDK version (Ex. Java SE Development Kit 8u65)
- select your OS, accept terms, download the .exe file, run it and just use all the defaults
- java oracle jdk
- Add repo and update
sudo add-apt-repository ppa:webupd8team/javasudo apt-get update
- Install java using
oracle-java<ver_num>-installer format. Example:
sudo apt-get install oracle-java8-installer
- Check java version:
- Selecting default versions:
sudo update-alternatives --config javasudo update-alternatives --config javac
Eclipse
Remote System Explorer
This allows you to edit files that are on an external server on eclipse locally to be automatically uploaded
- Go to eclipse download page and get Eclipse IDE for C/C++ Developers
- Unzip it to a accessible location I usually unzip it to C:/eclipse, tin the eclipse.exe file and select a workspace location
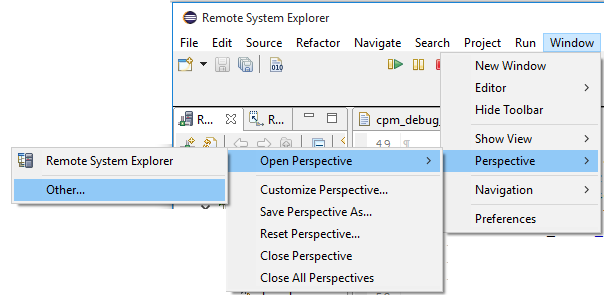
- Open Remote System Explorer Perspective. go to Window -> Perspective -> Open Perspective -> Other

- Select Remote System Explorer

- Create a new connection

- Select SSH Only
- Fill Host Name (can be IP of the server)
- Fill Connection Name Any name to identify the connection
- Uncheck Verify host name option
- Everything else leave as it is, you can click on Finish
- when asked for you password use the one you use to login into that server
Install Eclipse on Linux from .tar
Get tar from eclipse download page
Change to the directory you download the tar.gz file and untar it into /opt folder
sudo tar -zxvf eclipse-cpp-mars-1-linux-gtk-x86_64.tar.gz -C /opt/
Create eclipse.desktop file executing the following command:
sudo vim /usr/share/applications/eclipse.desktop
Put the following contents on the eclipse.desktop file:
 [Desktop Entry]
 Name=Eclipse
 Type=Application
 Exec=/opt/eclipse/eclipse
 Terminal=false
 Icon=/opt/eclipse/icon.xpm
 Comment=Integrated Development Environment
 NoDisplay=false
 Categories=Development;IDE;
 Name[en]=Eclipse
Install desktop file executing the following command
sudo desktop-file-install /usr/share/applications/eclipse.desktop
- Create a symlink in
/usr/local/bin
sudo ln -s /opt/eclipse/eclipse /usr/local/bin/eclipse
- If you are using Ubuntu it should now show up on the Unity Dash search results
Cygwin
- Install Cygwin. Recommended Packages:
- bash-completion
- bash-completion-devel
- git
- git-gui
- git-svn
- rsync
- gvim
- vim
- vim-common
- gnome-terminal
- curl
- python and python3
- tar
- apt-cyg
- make
- zip/unzip
- cygutils and cygutils-extra
- wget
- openssh ssh/ssh-agent
- findutils
- Install Java JDK as usual and add the following lines to your
.bashrc
export JAVA_HOME=/cygdrive/c/Program\ Files/Java/<jdh_version_here>/
export PATH=$PATH:$JAVA_HOME/jre/bin:$JAVA_HOME/bin
Notepad++ Tricks
Install a plugin
- Run Notepad++ as administrator (sometimes it gives problems if its not run as admin)
- Go to menu Plugins-> Plugin Manager -> Show Plugin Manager
- On the Available tab search for the wanted plugin, select it and click on the
install button to install it
Useful Notepad++ Plugins
- Explorer: plug in to have a file explorer window
- Remote file upload NppFTP: plugin to auto-upload files
- LocationNav: Plug in for history and track changes.
- SourceCookifier
- Compare: plug-in to compare files
- JSON Viewer: plug-in to format JSON files
Set server keys and Notepad++ to auto-upload files
As an alternative to work with files on a server you can set up Notepad++ to automatically upload files to a server so you can edit them and work on Notepad++ on Windows and they can be automatically uploaded to a server.
- Check if NppFTP plugin is installed or install this plugin
- Open the NppFTP plugin (Plugins -> NppTFP -> Show NppFTP Window)
- In the NppFTP window use the Settings (Gear icon) -> Profile Settings
- Create a new connection using the "Add New" button/option
- Give the connection a Name: Any text you want to identify this connection
- Select Connection type: SFTP
- Fill the Hostname, Username, Password and Initial remote directory (optional). Example:

- In the Authentication tab you can either select one of the two options:
- Check the "Try keyboard interactive authentication" option if you want to give it your password to connect and every time you start editing a file
- Check the "Try private key authentication" option if you plan to use a key file (see Create and Import private key instructions below), you will NEVER need to give your password
- Once you have a key file give the path to this generated .ppk file in the "Private key file" field
- If your key has a passphrase make sure to put it in the "Passphrase" field if not just leave this field blank.
Create and Import private key
- In the Linux Server (the one where the files will be automatically uploaded) execute the following commands to create the key
`ssh-keygen -t rsa`

 cat id_rsa.pub >> ~/.ssh/authorized_keys

 chmod 600 ~/.ssh/authorized_keys
If you already have a key you can skip the first command
Virtual Box Install and Config
- Install Virtual box.
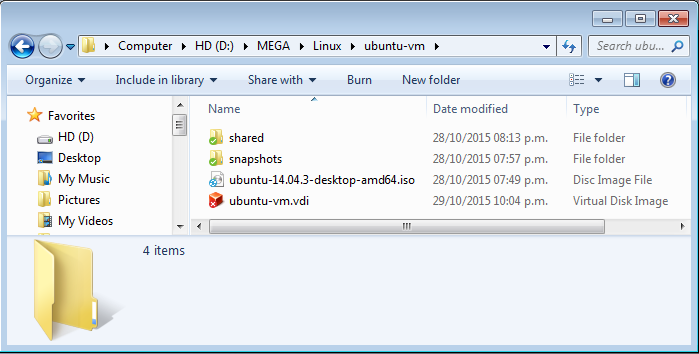
- Create a folder to store everything related to the VM
- put the .iso file there
- create a shared folder
- create folder for the snapshots
- when asked to create a virtual HD create it in that location and create one of at least 64GB
- In the VM Configurations modify Processor, RAM, and Video Memory with values appropriate to your host.
- Create shared folder and check the auto-mount option
- Install VB Guest additions
- In VB "devices" menu select "Guest Additions" options.
- Click run when prompted. Install kernel modules if a kernel modules error occurs
sudo apt-get install linux-headers-$(uname -r)
- Add your user to the
vbossf group if you have folder permissions error
sudo usermod -aG vboxsf $(whoami)sudo adduser $(whoami) vboxsf
We install this so full-screen mode and shared clipboard/copy-paste can work.
Virtual machine needs a restsart so this can take effect.
Switch between gnome and fvwm2
- use ION Sessions Manager to open a session on the terminal that is opened and change to the
/home directory (use cd ~)
Other commands
- Run eclipse as root
Windows Subsystem for Linux (WSL)
Enable SSH on WSL
- Edit
/etc/ssh/sshd_config make sure to set Port (other than port 22), Host Keys, Password Auth... for example it may look like this:
#       $OpenBSD: sshd_config,v 1.101 2017/03/14 07:19:07 djm Exp $
# This is the sshd server system-wide configuration file.  See
# sshd_config(5) for more information.
# This sshd was compiled with PATH=/usr/bin:/bin:/usr/sbin:/sbin
# The strategy used for options in the default sshd_config shipped with
# OpenSSH is to specify options with their default value where
# possible, but leave them commented.  Uncommented options override the
# default value.

Port 2222
#AddressFamily any
ListenAddress 0.0.0.0
#ListenAddress ::

HostKey /etc/ssh/ssh_host_rsa_key
HostKey /etc/ssh/ssh_host_ecdsa_key
HostKey /etc/ssh/ssh_host_ed25519_key

# Ciphers and keying
#RekeyLimit default none
# Logging
SyslogFacility AUTH
LogLevel INFO

# Authentication:
LoginGraceTime 2m
PermitRootLogin prohibit-password
StrictModes yes
MaxAuthTries 4
#MaxSessions 10

PubkeyAuthentication yes

# Expect .ssh/authorized_keys2 to be disregarded by default in future.
AuthorizedKeysFile      .ssh/authorized_keys .ssh/authorized_keys2

#AuthorizedPrincipalsFile none

#AuthorizedKeysCommand none
#AuthorizedKeysCommandUser nobody

# For this to work you will also need host keys in /etc/ssh/ssh_known_hosts
HostbasedAuthentication no
# Change to yes if you don't trust ~/.ssh/known_hosts for
# HostbasedAuthentication
#IgnoreUserKnownHosts no
# Don't read the user's ~/.rhosts and ~/.shosts files
IgnoreRhosts yes

# To disable tunneled clear text passwords, change to no here!
PasswordAuthentication yes
PermitEmptyPasswords no

# Change to yes to enable challenge-response passwords (beware issues with
# some PAM modules and threads)
ChallengeResponseAuthentication no

# Kerberos options
#KerberosAuthentication no
#KerberosOrLocalPasswd yes
#KerberosTicketCleanup yes
#KerberosGetAFSToken no

# GSSAPI options
#GSSAPIAuthentication no
#GSSAPICleanupCredentials yes
#GSSAPIStrictAcceptorCheck yes
#GSSAPIKeyExchange no

# Set this to 'yes' to enable PAM authentication, account processing,
# and session processing. If this is enabled, PAM authentication will
# be allowed through the ChallengeResponseAuthentication and
# PasswordAuthentication.  Depending on your PAM configuration,
# PAM authentication via ChallengeResponseAuthentication may bypass
# the setting of "PermitRootLogin without-password".
# If you just want the PAM account and session checks to run without
# PAM authentication, then enable this but set PasswordAuthentication
# and ChallengeResponseAuthentication to 'no'.
UsePAM yes

#AllowAgentForwarding yes
#AllowTcpForwarding yes
#GatewayPorts no
X11Forwarding yes
#X11DisplayOffset 10
#X11UseLocalhost yes
#PermitTTY yes
PrintMotd no
#PrintLastLog yes
#TCPKeepAlive yes
#UseLogin no
#PermitUserEnvironment no
#Compression delayed
#ClientAliveInterval 0
#ClientAliveCountMax 3
#UseDNS no
#PidFile /var/run/sshd.pid
#MaxStartups 10:30:100
#PermitTunnel no
#ChrootDirectory none
#VersionAddendum none

# no default banner path
#Banner none

# Allow client to pass locale environment variables
AcceptEnv LANG LC_*

# override default of no subsystems
Subsystem       sftp    /usr/lib/openssh/sftp-server

# Example of overriding settings on a per-user basis
#Match User anoncvs
#       X11Forwarding no
#       AllowTcpForwarding no
#       PermitTTY no
#       ForceCommand cvs server
- Generate host keys
sudo ssh-keygen -A
- Restart SSH service
sudo service ssh --full-restart
- You may need to enable on boot
sudo systemctl enable ssh or manually restarting every time


