Raspberry Pi
Config
Default user
user: pi
password: raspberry
- Get the .zip from raspberry pi download page and unzip it to get
.img file
- Get an app to write the image run it as Administrator and use it to write image to your media, for example:
Setup wifi
Check available networks with sudo iwlist wlan0 scan
Edit /etc/wpa_supplicant/wpa_supplicant.conf file and add the following lines at the of the file:
network={
    ssid="ssid_name_here"    # e.g. "Home"
    psk="wifi_password_here" # e.g. "mypass123"
    id_str="id_ssid"         # e.g. "home"
}
Restart network interface and/or reboot system
sudo ifdown wlan0
sudo ifup wlan0
sudo reboot
raspi-config
Use raspi-config or sudo raspi-config command to
- enable SSH (Advanced options -> Interface Options -> Enable or disable ssh server)
- Other misc stuff like hostname, region, timezone, language, keyboard...
- Set up autologin (Boot Options -> Console Autologin)
You usually need to reboot (sudo reboot) for changes in raspi-config to take effect
Add NTFS and exFAT support
- Install ntfs-3g package:
sudo apt-get install ntfs-3g
- Install exFAT packages:
sudo apt-get install exfat-fuse
Config Remote Access
For remote access you can either use a third party webpage/service or open
a port on your network and forward all traffic of that port to the Raspberry Pi but first is recommended the Raspberry Pi device has a static IP address
Set Static IP
Using dhcpcd.conf config file
- Edit the
/etc/dhcpcd.conf file, add the following lines at the end of the file and after that reboot# <the id_ssid of wpa_supplicant.conf here> static_wlan0 # Use this if you want to use id_ssid from the /etc/wpa_supplicant/wpa_supplicant.conf file
interface wlan0 # use eth0 if its a wired connection
static ip_address=192.168.0.10/24 # <static_ip>/24 use ifconfig
static routers=192.168.0.1 # <gateway> the router ip use route -n or netstat -r
static domain_name_servers=192.168.0.1 # <dns_server_ip> usually the router ip or gateway
Optional Add the public key of the computer that will ssh into the pi to the ~/.ssh/authorized_keys file
Make sure to choose an IP address outside of the DHCP server address range if you don't you may or may not have issues with IP assigment, usually the DHCP server is the router so you can check the range on the router config page
Using /etc/network/interfaces file (Deprecated)
- On the
/etc/network/interfaces file add the following lines using the id_ssid you used on the wpa_supplicant.conf file and after that, rebootiface <id_ssid> inet static
address <static IP address>
gateway <gateway> # <gateway> the router ip use route -n
netmask <netmask> # subnet mask usually 255.255.255.0
You may need to disable dhcpcd sudo systemctl disable dhcpcd and just enable networking sudo systemctl enable networking
On the /etc/network/interfaces file you may need to add static to the iface wlan0 or iface eth0 lines
Network issues
- If after a reboot you dont see an IP address is asigned to the rasp-pi when previously this was working you can check if you are
able to successfully connect your Raspberry Pi to the WLAN network using the wpa_supplicant tool: sudo wpa_supplicant -iwlan0 -c /etc/wpa_supplicant.conf
If that returns an error usually the/var/run/wpa_supplicant/wlan0` got corrupted, removing it and rebooting should fix the issue
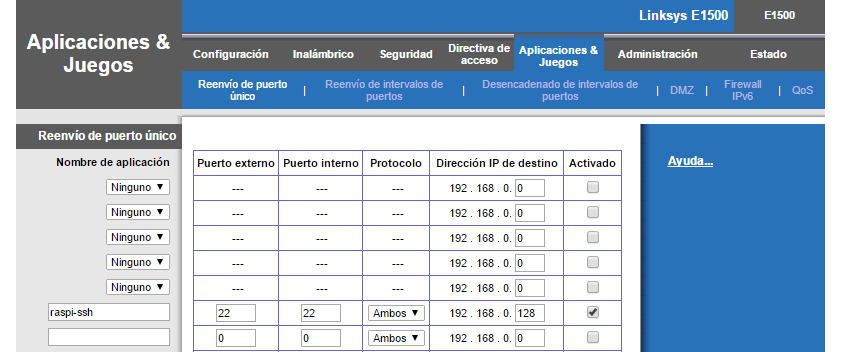
Port Forwarding
Configure port forwarding on the router (Usually a personal device connected to the modem)
- Connect to the default gateway of the router (Ex:
192.168.0.1).
- Add an entry with the desired port and IP Address of the Raspberry Pi (Ex:
192.168.0.128) which is assigned by Router (Raspi device).
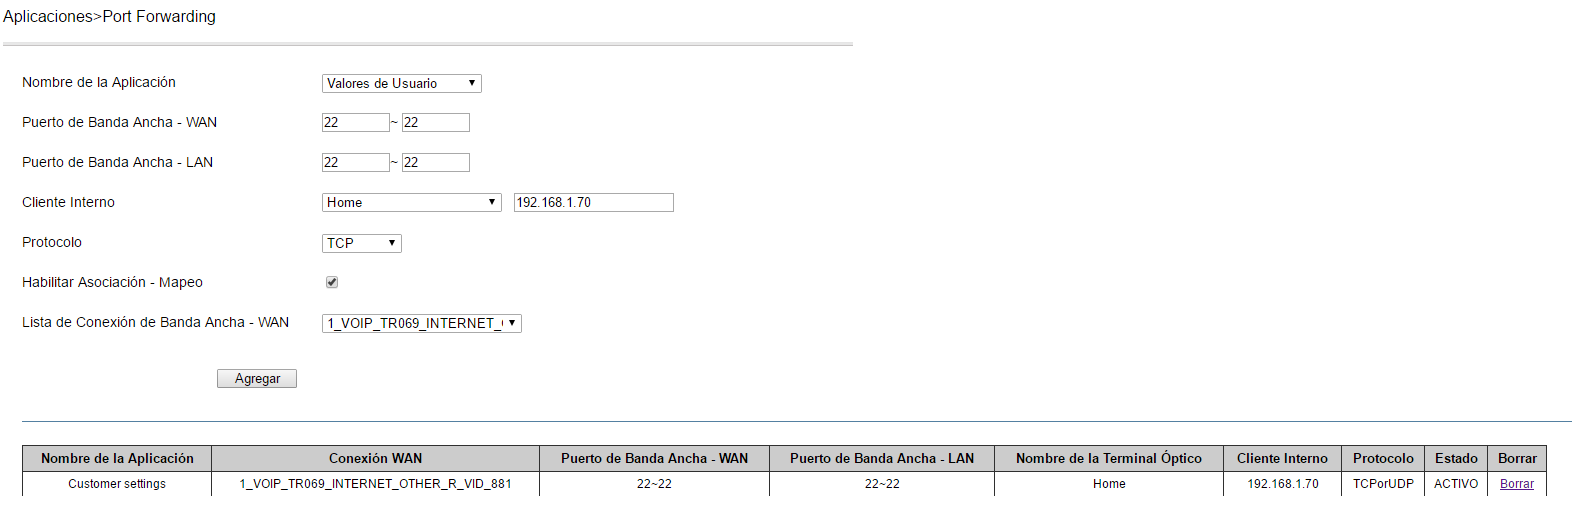
Configure port forwarding on the modem (Usually provided by the ISP)
- Connect to the default gateway of the modem (Ex:
192.168.1.254).
- Add an entry with the desired port and IP Address of the Router (Ex:
192.168.1.70) which is assigned by the modem (the one provide by the ISP)
Connect
- Using a Port Test Tool check if port is open.
- Use external IP address and configured port to ssh into the Raspberry Pi
You can use whatsmyIP to get your external IP address (Ex: 189.163.12.246)
Weaved (Third Party Remote Access Service)
Using Weaved create a account on its page
- user:
email_here ; pasw: your_pass
Follow the page instructions to install and run the Weaved service
Log in into your Weaved account and use the provided IP and port to ssh into the raspberry
RDS (Remote Desktop Server)
- Connect to the RPi using RDP (Remote Desktop Protocol) which is a Microsoft's proprietary protocol, so you can easily use Windows RDC (Remote Desktop Connection)
which is Microsoft native application for remote connections to the Raspberry Pi
- xrdp Setup
- Setup Static IP, this this not strictly required but highly recommended
- Install xrdp
sudo apt-get install xrdp
- When package installation finish you can now use the RPi IP address and Windows RDC to connect remotely to the RPi
VNC (Virtual Network Computer)
- Control a computer from another computer over a network
- Setup:
Set a static IP (Check the Set Static IP section)
Install a VNC server on the device you want to control remotely you can use the raspi-config command and the Enable VNC option or use the following commands
sudo apt-get install realvnc-vnc-server
Make sure NOT to run these commands from a remote or SSH connection it can cause installation issues
You can choose 'No' when asked for view only password
If you used the raspi-config command to install realVNC then by default is setup to auto start, the following commands are for reference only in that case
- Start or stop VNC server service with
systemctl (start|stop) vncserver-virtuald.service
- Enable or Disable auto start VNC server service with
systemctl (enable|disable) vncserver-virtuald.service
Install a VNC client and connect to the remote device with it
- Get a VNC client/viewer for example RealVNC Viewer
- Use the IP of the RPi to connect, for example:
192.168.0.40 (default port is ::5901)
Node.js
- Attempting to install directly using the package manager, installation errorr can appear since som AR HW may not be supported by the NodeSource Linux distributions.
- If the package manager installation doesnt work get the .tar for your HW (check your HW cmd:
cat /proc/cpuinfo) and copy to /usr/local
wget https://nodejs.org/dist/latest-v8.x/node-v8.11.3-linux-armv6l.tar.gz
tar -xvf node-v8.11.3-linux-armv6l.tar.gz
cd node-v8.11.3-linux-armv6l
sudo cp -R * /usr/local/
check https://nodejs.org/dist/ to get the right NodeJS version for you, latest version may have installation problems I tried node v8.11.3 on raspberry pi 2 and worked
Install NodeJS in Rpi
Heroku
- There's no official support for Raspberry Pi so you need to get the tar, install and update
- Get the tar, untar in
/usr/local/lib and create sym link
wget https://cli-assets.heroku.com/branches/stable/heroku-linux-arm.tar.gz
sudo tar -xvzf heroku-OS-ARCH.tar.gz -C /usr/local/lib
sudo ln -s /usr/local/lib/heroku/bin/heroku /usr/local/bin/heroku
make sure /usr/local/lib and /usr/local/bin exists, create them otehr wise mkdir -p /usr/local/lib /usr/local/bin
- Finally update heroku:
heroku update latest version didnt work fro me on Rpi so I skipped this step
Install Heroku-cli in Rpi
Transmission
- Install Transmission:
sudo apt-get install transmission-daemon
- Stop Transmission daemon:
sudo systemctl stop transmission-daemon
- Create directories for in-progress and completed downloads in the RPi and update permissions
sudo mkdir -p /media/pi/D/inprogress
sudo mkdir -p /media/pi/D/completed
sudo chown -R pi:pi /media/pi/D/inprogress
sudo chown -R pi:pi /media/pi/D/completed
- Edit
/etc/transmission-daemon/settings.json file (sudo vim /etc/transmission-daemon/settings.json) to configure the following settings:"incomplete-dir": "/media/pi/D/inprogress",
"incomplete-dir-enabled": true,
"download-dir": "/media/pi/D/completed",
"rpc-password": "Your_Password", # Here you can use your RPi username
"rpc-username": "Your_Username", # Here you can use your RPi credentials or other exclusive Tranmission password
"rpc-whitelist": "192.168.*.*",
- Edit
/etc/init.d/transmission-daemon file (sudo vim /etc/init.d/transmission-daemon) and change USER to the user who owns
the folders set in incomplete-dir and download-dir in our case the user is pi so we set USER=pi
- Edit
/etc/systemd/system/multi-user.target.wants/transmission-daemon.service file (sudo vim /etc/systemd/system/multi-user.target.wants/transmission-daemon.service)
and change user to the user who owns the folders set in incomplete-dir and download-dir in our case the user is pi so we set User=pi
- Reload daemon:
sudo systemctl daemon-reload
- Update ownserhip of
/etc/transmission-daemon folder: sudo chown -R pi:pi /etc/transmission-daemon
- Create the directory where the setting.json file will be accessed by the transmission-daemon:
sudo mkdir -p /home/pi/.config/transmission-daemon/
- Create symlink to the previously create folder and the settings.json:
sudo ln -s /etc/transmission-daemon/settings.json /home/pi/.config/transmission-daemon/
- Update permissions to the previously create folder:
sudo chown -R pi:pi /home/pi/.config/transmission-daemon/
- (Recommended) Make sure to update folder permissions on
/etc, /var, /media:sudo chown -R pi:pi /etc/transmission-daemon
sudo chown -R pi:pi /etc/init.d/transmission-daemon
sudo chown -R pi:pi /var/lib/transmission-daemon
sudo chmod 777 /media/
sudo chmod 777 /media/*
sudo chmod 777 /media/*/*
- Start Transmission:
sudo systemctl start transmission-daemon
- Access Tranmission client by opening a browser and going to:
http://your_pi_ip:9091
- if it prompts for password enter the credentials set on
/etc/transmission-daemon/settings.json file
VLC
- Install:
sudo apt install -y vlc
- You can use
vlc command or vlc path_to_video/video.mp4 to open a video file or use th GUI under Sound and Video
References