Deploy
Azure
Azure Intro
Azure App Service is a component of Azure's Platform-as-a-Service (PaaS) or Infrastructure-as-a-Service (IaaS) offering, it is a cloud-based service for hosting Web, Mobile, API, and Logic apps.
Azure provices datacenters used to host applications and you "rent" services and offers some free services
PaaS and IaaS means Azure is handling the infrastructure and platform (System, OS, networking, etc.) for the application
Azure terms
- The Azure Portal is your access point for all of Azure's services
- The Azure Marketplace is where you can browse through services that can run on Azure
- Subscription: Every service that is "purchased" on Azure is billed to a subscription and when you use a service on Azure,
you create and configure an instance of that service for your use. That instance is referred to as a resource
and every resource you create must be associated with a resource group which just is a logical grouping of resources.
App Insights is a service of Azure that allows for advanced analytics and tracking of web applications
Deployment Options
- FTP: Deploying to Azure App Service using File Transfer Protocol (FTP) which is just a direct file transfer from a client machine to Azure
- Local Git: push your changes to your Azure App Service.
- Cloud Sync: You can connect to common cloud storage services, such as OneDrive and Dropbox, to enable on-demand sync deployment to your Azure App Service.
- CD Continuous Deployment: Configure Azure App Service to continuously pull updates from your cloud repo (like GitHub or BitBucket ) and automatically build and deploy.
Deployment Credentials Config
- user-level credentials are associated with your Azure account and app-level credentials are associated with apps cause they are different for each specific app on your account.
Deploy Node.js with git in Azure
Based on Azure Node.js get started
and MSDEV280x Deploy with Git and Azure
- Create an account on Azure, you will need a phone number and a credit card
- Go to Azure portal and create a WebService App you can use the info from Azure Node.js get started which uses the Azure terminal or use the GUI from the Azure portal
- In your Service App go to Deployment -> Deployment Center to configure git as deployment option (Local Git Repo), once that is configured you should be able to setup you credentials using the Configure Credential option, you will need to provide user name and password
- Get the Git URL from your Service App it should be in the deployment center or in Settings -> Properties, it should looke like:
https://myusername@myappservice.scm.azurewebsites.net:443/myappservice.git
- In your local git repo configure remote branch for deployment with:
git remote add azure <Git URL Here>
- Make sure to have the changes you want to deploy commited to master then push your changes to make the deployment on azure with command
git push azure master
- You will need to provide the password you setup for your credentials
- After deployment you should be able to go to the Azure URL provived in you WebService App (*Settings -> Properties) to check you deployment, URL should look like:
myappservice.azurewebsites.net
Heroku
Create Heroku app and Deploy Node.js with git using Heroku CLI
Based on https://devcenter.heroku.com/articles/getting-started-with-nodejs
- Create an account on Heroku, Install Heroku CLI and Login
- install:
sudo snap install heroku --classic
- login:
heroku login
- Enter the email and password you use to access Heroku
- check dependencies, you wil need:
node --version, npm --version and git --version
This step is needed only the first time you setup the system you plan to use to push/deploy to Heroku if you have already done this for a previous app you can skip this step
cd to the repo of your project. Preferably on the root of your project the package.json should exists if thats not the case a symlink may be used as a worrkaround
cd <your_project_git_repo_name_here>
Create heroku app: heroku create, you should see an output like the following:
heroku create
Creating app... done, ⬢ thawing-inlet-61413
https://thawing-inlet-61413.herokuapp.com/ | https://git.heroku.com/thawing-inlet-61413.git
- verify a remote branch was created, you can use
git remote -v for this and should see something like:
$ git remote -v
heroku  https://git.heroku.com/thawing-inlet-61413.git (fetch)
heroku  https://git.heroku.com/thawing-inlet-61413.git (push)
origin  git@bitbucket.org:<your_project_git_repo_name_here>.git (fetch)
origin  git@bitbucket.org:<your_project_git_repo_name_here>.git (push)
> if a remote branch was not created you must do it manually with the command: `heroku git:remote -a thawing-inlet-61413`
- Make sure you have your start script setup in your
package.json
...
  "scripts": {
    "test": "node app.js",
    "start": "node app.js"
  },
  ...
push to heroku remote: git push heroku master
if the buildpack is not detected you may get an error with this message you can set it up with: heroku buildpacks:set heroku/nodejs
Push to an existing Heroku App
Install Heroku CLI and log in:
- install:
sudo snap install heroku --classic or curl https://cli-assets.heroku.com/install-ubuntu.sh | sh
- login:
heroku login
cd to the repo of your project and setup the Heroku remote: heroku git:remote -a <heroku_project_name_id_here> e.g. heroku git:remote -a thawing-inlet-61413
verify a remote branch was setup correctly, you can use git remote -v for this and should see something like:
$ git remote -v
heroku  https://git.heroku.com/thawing-inlet-61413.git (fetch)
heroku  https://git.heroku.com/thawing-inlet-61413.git (push)
origin  git@bitbucket.org:<your_project_git_repo_name_here>.git (fetch)
origin  git@bitbucket.org:<your_project_git_repo_name_here>.git (push)
- Now you can push to
heroku using : git push heroku master
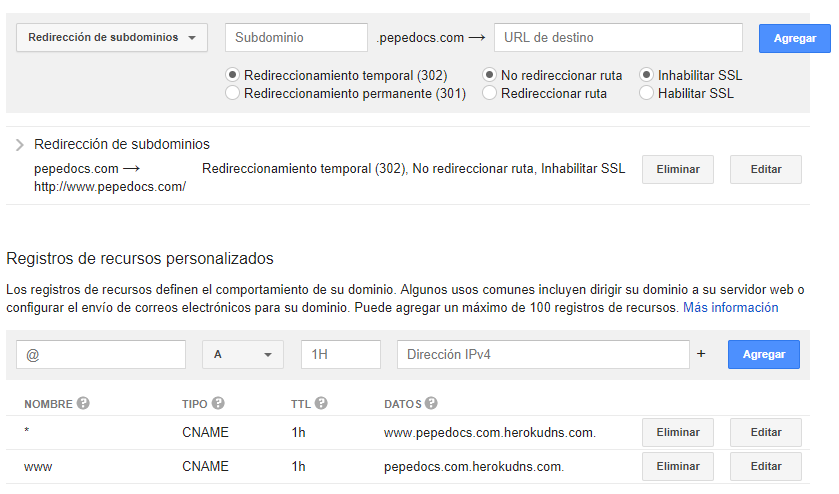
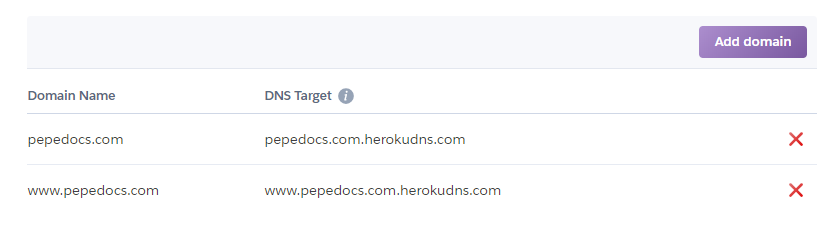
Configure Google domains + Heroku
- Heroku domain config
Google Domains config