Web Development
Semantic Markup
- Semantic markup is text data that is annotated using a special language to offer additional meaning to the text.
- allow them to focus on the meaning (semantics) of their content (markup) and not worry about design.
- The most commonly mentioned implementation of semantic markup is HTML
XML
- XML was designed to represent data in a format that was both human and machine-readable
- Requires attributes to be explicit.
- Can represent data in a hierarchical format
- Every XML document must begin with a declaration that includes version and encoding
<?XML version="1.0" encoding="UTF-8"?>
Constructs
Tag: A construct that begins with the < character and ends with the > character
- Opening (or Start) Tag: These tags represent the beginning of a logical component in XML. Ex:
<item>
- Closing (or End) Tag: These tags represent the end of a logical component in XML. Ex:
</item>
- Empty Element Tag: These tags represent both start and end of a logical component without any child content. Ex:
<item />
Element: a construct that includes either an empty element tag or a set of opening & closing tags
Attribute: A constructs that describe a key-value pair in an element and provides additional metadata about the element
- Ex.
<plucode description="Blood Orange">4381</plucode>
HTML
HyperText Markup Language that defines/describes the structure of a webpage
A web page constructed using HTML has basic and essential elements
HTML allows us to encode the structure of a page using tags <tagName></tagname>
MDN
Essential Elements
- The HTML element: Represents the root of HTML docs. Any subsequent elements are the children of this root element.
- The HEAD element: Represents a collection of metadata for HTML doc.
- The BODY elements: Represents the main content of the document.
<!DOCTYPE HTML>
<!-- HTML Element -->
<html lang="en-US">

    <!-- HEAD Element -->
    <head>
        <title>Sample Web Page</title>
    </head>

    <!-- BODY Element -->
    <body>
        Welcome
    </body>

</html>
Basic Elements
Reference to all HTML elements
Text
<p></p> - Paragraph: Designates you want to create a text paragraph<hN></hN> - Headers: Up to six levels of headers- Text Format:
| Format |
Markup |
Result |
| Bold |
<b> |
Bold Text |
| Strong |
<strong> |
Strong Text |
| Italic |
<i> |
Italic Text |
| Emphasized |
<em> |
Emphasized Text |
| Small |
<small> |
Small Text |
| Marked |
<mark> |
Marked Text |
| Deleted |
<del> |
Deleted Text |
| Inserted |
<ins> |
Inserted Text |
| Subscript |
<sub> |
Subscript Text |
Containers
- Elements that define how things will be drawn
- Dictates what the default rendering logic will be for the content within that element or the element itself
- Typically you can only place inline elements within a block element
- Block elements or Block-level elements
- Block-level elements always take up the full-width that is available on-screen and each is rendered in a new line
- Each Block elements get it's own line
- Examples :
<br>, <body>, <p>, <hN>
- The
<div> element is a multi-purpose element that simply gives you a container for other content (generic block container).
- Inline Elements
- They only take up the width that they need to render their content, they may render on the same line if they are not too large to be displayed on the same line.
- The most common inline element is the
<span> element (generic inline container).
Others
<img> - Images: This tag provides metadata about the image file and preferred sizing to help the browser decide how to render the image.<a></a> - Hyperlinks: Allow to reference external, remote documents (web pages) and also reference elements within the same page.
Attributes
- Attributes are the way we add additional information to an html element
- They are key-value (property-value) pairs that are added to an html element
- Not every attribute works on every single element
- An HTML form is used to collect user input and represents a user-submittable form (it's a block element)
- Forms allows your to collect data using input fields and submit that data to a server or web service
- The form element has two primary attributes
- The
action attribute indicates the URL where the form will be submitted
- The
method attribute indicates the HTTP method used when submitting the form
- The
submit type is the one used to indicate that an input will be used to submit a form
<fieldset> and <legends> are usually used to group split into different input sections
To build a form in HTML you can use a variety of input elements. Each input element offers options that allow you to control features such as validation or watermarks.
<textarea /> - Text Area: Renders a multi-line text input control.<select /> - Select: Renders a drop-down list with multiple options.<optgroup /> - Option Group: Group related option.<input /> - Input: Its the basic form element in HTML, used to capture text and numeric values
- input types: button, checkbox, file, hidden, image, password, radio, text, submit
<button /> - functions similarly to an input element of type button but it also allows you to render custom content within the button.
- HTML5 introduced field validation
- You can always skip validation using the
novalidate attribute
- Attributes were introduced that allowed for the most common and simple validation requirements, specify rules the input must comply before the HTML form is saved
| Attribute |
Description |
Ex |
| required |
Specifies that a text input must have valid data |
required="required" |
| pattern |
Specifies a regular expression that the value of the input field must match |
pattern="\d{5}(-\d{4})?" |
| readonly |
Specifies that a particular field is read-only and cannot be modified by the user |
readonly="readonly" |
| disabled |
Specifies that a particular field is disabled and cannot be modified by the user |
disabled="disabled" |
| min/max |
Used with the range input type to specify boundaries for the selected numeric value |
type="range" min="1" max="15" |
| autocomplete |
Toggle the auto-complete feature found in most modern browsers |
autocomplete="off" |
| placeholder |
Renders a "watermark" that is shown when the input is empty |
placeholder="Watermark here |
Semantic Elements
- Non-Semantic Elements:
- Elements that do not have any obvious meaning to other developers or designers
- Semantic Elements:
- Work identically to other block-level containers but provide meaning
- They give additional metadata, so that it's machine-readable and can be used by client extensions, browsers, JavaScript, etc.
SVG
- Scalable Vector Graphics (SVG) is an image format that can draw 2D graphics directly in the browser.
- SVG is based on XML and supports features such as interactivity, transitions and animations.
- HTML5 introduced the ability to embed SVG graphics directly in web pages and can also be manipulated directly with CSS or JavaScript.
- The
<svg> element is used to define an SVG element and the <rect>, <circle>, <text>, etc. elements can be used to draw basic shapes
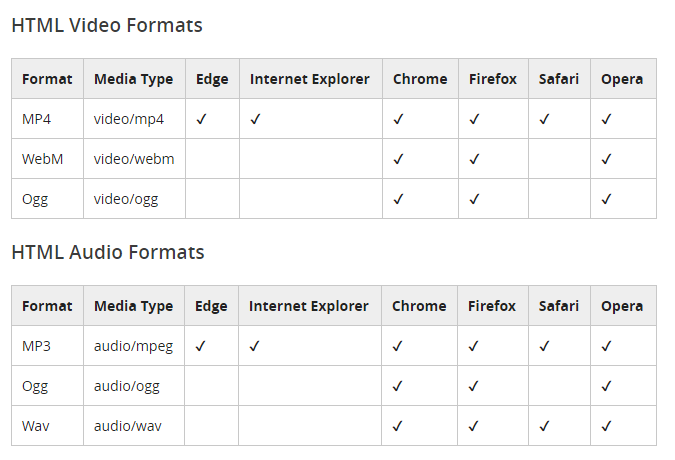
- HTML5 supports basic multimedia playback with a new set of media elements
- This elements allow you to specify video/audio source(s), along with some parameters to play video or audio directly on your HTML page.
- Supported media formats:
CSS
- Language that describes the style of a web page
- Cascading Style Sheets (CSS) is a language that controls and allows to define the look of an HTML document.
- Allows to explicitly and clearly separate the content from the design of the HTML doc
- The CSS rules can be defined:
- Inline - done in the HTML tag
- Internal Style Sheet - coded at the beginning of a HTML document
- External Style Sheet - this is a separate file with a
.css extension references by other(s) HTML doc(s)
CSS Syntax
Declaration: Contains one or more property-value pairs
- property: the CSS element being manipulated (color, font, alignment...)
- value: the actual value set to the property
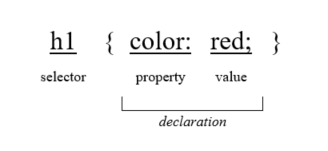
Selector: Defines the HTML element being manipulated
We can use commas on the selector section to target multiple elements. Ex. header, footer { color: black; }
We can use greater-than > to target all Direct Descendants of the specified type within another element Ex. section > nav { color: black; }
We can use space to target all elements inside of another element Ex. section nav { color: black; }
We can use space + to target adjacent elements sibling elements Ex. h4 + ul { color: black; }
We can use space select all elements with a certain attribute Ex. a [href="http://www.google.com]" { color: black; }
We can create CSS classes and then specify the HTML elements that belong to that CSS class.
- Set class attribute in the html element and use
. in the selector in the .css file
A CSS ID is a unique identifier for an element which can only be declared once within the same HTML file and is normally very specific
- Set id attribute in the html element and use
# in the selector in the .css file
CSS selectors
CSS Inheritance
- Inheriting CSS Styles is the process by which styling rules of a parent element are applied (inherited) by multiple child elements
- Some CSS properties are automatically inherited but some other not because they may cause conflict.
- Inherit property value allows you to increase the weight of the property inherited.
- Makes it possible to set characteristics to multiple elements.
- CSS styles can come from many different sources/places:
- Browser stylesheet: All browsers have a default stylesheet and this style is used when no other CSS styles are specified.
- User settings: User specific settings configured in a browser. These styles override the ones set by default in the browser.
- Author CSS: The declarations created in stylesheets (inline or external) by the author of the HTML page override both the user settings/declarations and browser settings.
- In CSS you can use the keyword !important to override existing CSS declarations (styles). Ex:
body {color: red !important;}
- Specificity
- It is the idea that we can have multiple styles targeting the same element
- The style that is closest (more specific) is the one that has priority in case of equal specificity the latest declaration is the one used
CSS Media Queries allow us to conditionally apply CSS in specific scenarios based on properties of our current browser and can contain simple logic using and for logic AND and , for logic OR
Fonts
CSS font stack
Google Fonts
Google Fonts how-to
Color Background and Border
Color
- CSS built-in named colors
color: red;
- HEX
color: #FF0000;
- RGB
color: rgb(255, 0, 0);
- RGBA
color: rgba(255, 0, 0, 0.5);
Background
- Built-in, RGB, RGBA, HEX
background: red;, background: #FF0000;, background: rgb(255, 0, 0);, rgba(255, 0, 0, 0.5);
- url
background: url(http://3dprint.com);
Border
- A border needs three parts:
width, color, style in order to show border: 5px solid purple
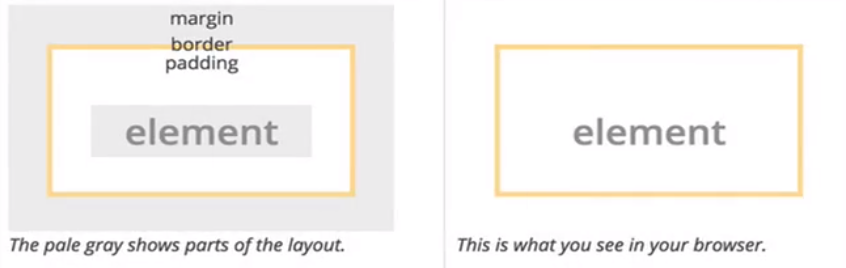
The Box Model
- It states that each html element is represented as a rectangular box and each box has four edges: border, margin, padding and content
- float property makes elements out of the flow of the document whether they are inline or block elements and floats them to the specified direction E.x.
float: left
Margin and Padding
- The used order is always: top, right, bottom, left
- Padding: Defines the amount of space that should appear between the content of an element and the element border.
- Margin: Defines the space between an HTML element and the surrounding elements, it's the space between the border and any other element.
margin: auto auto auto auto; is a value to center between elements
- Properties like
text-align, width and height operate over the Content of an element
- Percent in
width and height represents the percent of the the parent element that a certain element will take
Bootstrap
- HTML, CSS and JS framework
- Its a
.css file and a .js file that we can include in our application to use the functionality provided by those files
.css is just a bunch of class definitions that we can use to style our html elements
make sure to put your own CSS file after including bootstrap so overrides work
- Install:
- Locally: Get files (.zip) extract them and link them in your page
- CDN (Content Distributed Network): Add links to a hosted version of the files
Scripts are added at the end of the html, make sure to get jQuery and add it before the bootstrap .js script
Grid System
- Every time we use a bootstrap grid it needs to be inside a container and we need to define rows where each row has up to 12 columns
- Bootstrap divides screens in 4 sizes so the best practice is to specify ratios and proportions for each one of those sizes:
- xs < 768px
- 768 =< sm < 992
- 992 =< md <1200
- lg >=1200
<div class="container">
   <div class="row">
    <div class="col-lg-3 col-md-3 col-sm-6 col-xs-12">COL 1</div>
    <div class="col-lg-3 col-md-3 col-sm-6 col-xs-12">COL 2</div>
    <div class="col-lg-3 col-md-3 col-sm-6 col-xs-12">COL 3</div>
    <div class="col-lg-3 col-md-3 col-sm-6 col-xs-12">COL 4</div>
  </div>
</div>
JavaScript
- JavaScript is a client side, interpreted, object-oriented, high-level scripting language.
- Language that adds logic and interactivity to a webpage
- It is a programming language or an object-based programming written into an HTML page to make it more interactive that relies on the browser to run.
- JavaScript executes only on the web page that is in the window of the browser at any set time, it uses the script tag
<script> to define the code which can be embedded in HTML to be interpreted and executed by the client’s browser
- Usage
- Form processing such as user input validation during the form submission, modify the contents of the form.
- Create dynamic page contents, adding multimedia elements such as showing, hiding, changing, creating image role overs, scrolling text across the status bar, etc.
- With CSS to make Dynamic HyperText Markup Language (DHTML) which enables the appearance and disappearance of webpages
JavaScript Types
Primitives
- Boolean: Represents Boolean logic
true or false
- Number: Represents all numeric data (integers, real numbers, scientific notation, hexadecimal...)
- String: Sequence of characters that represent textual data. Declared with
"" or ''
- Although the are more like values, undefined and null are considered primitives as well in JS by some references
undefined and null
The two possible states/values for a variable if it does not have a value assigned in JavaScript are:
- undefined: Represents a value that is not known but its different to something that doesn't exist. Used when variables haven’t been assigned a value they are defaulted to
undefined
- Variables declared but not initialized are undefined, it means a variable doesn't have a value yet
- null: Represents an intentional absence of value. Used to initialize or clear
Variables, flow control, operators
- CamelCase is the convention for JS variables E.x.
myVariable = "Hell"
- Variables can change type dynamically because of dynamic typing
- There a type coercion operators
=== and !== which also compare type unlike == and !=
- Every value is truthy and/or falsy. falsy: 0, "", null, undefined, NaN everything else is truthy
Objects
- An object is a list of unorganized primitive data types (and at times reference data types) stored as a sequence of name-value pairs.
- Objects can also serve as associative arrays (array indexed via strings)
- To reference a property or method of an object we use the
. operator or the with keyword
- All objects in JS are descendants of an object called Object.
- JavaScript Native Objects: These are built-in or native objects that are accessible anywhere in your program:
Number, Boolean, String, Array, Date, Math, RegExp
- Arrays are special objects created with the
[] or with the Array keyword and the values stored in them do not need to be the same type, you can have arrays within arraysfunction myFunc() {};
var cars = ["Saab", "Volvo", "BMW"];
var myArray = new Array(3);
myArray[0] = Date.now;
myArray[1] = myFunc;
myArray[2] = new Array("Demo", "Test");
HTML5 JS and Built-In methods
- HTML5 changes the web landscape considerably, because the specification mandates support for JavaScript APIs which can be used to build web pages which can act as web applications.
- HTML5 introduced local storage which allows web applications to store data directly in the user's browser.
- Local storage is isolated per website domain and protocol so every web page in your website that uses the same protocol and the same domain can access the same local storage data.
- The JS
localStorage (non-volatile) and sessionStorage (volatile) objects are used to data stored locally on the browser client
- HTML5 includes a Geolocation API that allows you to query the position of a user either at a point in time or over a period of time (tracking).
- The
getCurrentPosition() and watchPosition() methods are used to setup this
- Common built-in methods:
alert() , prompt(), console.log():
JS Events
- When something happens to an HTML element, you can write JavaScript logic to be executed
at that point in time. Your JavaScript functions can essentially "react" to something that happens
to a HTML element. These are referred to as events.
- Examples:
- Web page has finished loading (
onload)
- Someone put content in a HTML input form
- A button was clicked on the web page (
onclick)
- Handling:
- Defining the callback specifically on the HTML doc
- Using JS to set the callback
- Using JS to set an event listener to an HTML element
- Web Workers: its a JavaScript file with logic written to run in the background
which is used to offload long-running and slow tasks and avoid unresponsive web sites
DOM (Documentation Object Model)
- It's standard convention for representing and interacting with elements in HTML
- The DOM is the interface between your JS code and the HTML+CSS
- A collection of JS objects and methods that we can use to interact with the HTML and CSS
- Each HTML tag creates an element/object in the DOM tree that we can manipulate and everything is stored inside the
document object
- It's a bunch of JS objects that are modeling elements in our HTML
DOM selectors
The main JS methods to select DOM elements:
document.getElementById(): use element ID and returns a single element
    var elem = document.getElementById("myid")
    elem.innerHtml = ""
document.getElementsByClassName(): use class name and returns a list or nodelist
    var elem = document.getElementsByClassName("myclass")
    console.log(elem.length)
    elem[0].innerHtml = ""
document.getElementsByTagName(): takes as input element tags like h1, li, div, etc. ands returns a list or nodelist
    var elem = document.getElementsByTagName("tag")
    console.log(elem.length)
    elem[0].innerHtml = ""
document.querySelector(): selects and returns only the first element that match the specified CSS style selector
    var elem = document.querySelector("#myid")
    elem.innerHtml = ""
    var elem = document.querySelector(".myclass")
    elem.innerHtml = ""
document.querySelectorAll(): selects and returns a nodelist of all the elements that match the specified CSS style selector
    var elem = document.querySelectorAll("#myid")
    elem[0].innerHtml = ""
    var elem = document.querySelectorAll(".myclass")
    elem[0].innerHtml = ""
CSS style selector is any valid CSS selector so for example for ID we use #, for class we use ., for html tags we use the direct HTML tag name like h1, li etc.
DOM Manipulation
We usually manipulate 3 main things in a element:
- style:
- We use the
style object to manipulate specific properties like background, color, etc.
- We use the
classList.add("classname"), classList.remove("classname") and classList.toggle("classname") to add, remove and toggle a class we have defined in our .css to add style to an element
- content:
- We use the
textContent or innerHtml properties
- attributes:
- We use
getAttribute("attr_name") and setAttribute("attr_name", "value") to change HTML attributes of an element like href, src, etc.
EventListeners
- We can have more that one EventListener on a given element and more than one for the same type
- To add an event listener to an element we use the
addEventListener(type, callback) method
- As a reminder the
this keyword inside a listener refers to the element that triggered the event
Events Reference
Web Frameworks
jQuery
- jQuery is a fast, small, and feature-rich JavaScript library.
- jQuery is focused on methods (functions) that help you manipulate the Document Object Model (DOM) so it's a DOM manipulation library.
- jQuery can use the
$.ajax object and it's methods to make queries to external sources (web services, files, APIs, etc).
- So jQuery selectors are quick way to be able to query different elements within your own JavaScript so that you can perform actions on that set of elements.
- jQuery Advantages:
- Shorter version of JS only code in some cases
- Cross border support
- AJAX short support
- jQuery Disadvantages:
- It's an unnecessary dependency
- Performance
- You can do everything jQuery does with plain (vanilla) JS
- jQuery?
- jQuery Selector: uses the
$ and takes as input any CSS selector and return a list. E.x. $(#myid)
jQuery Manipulation
The jQuery manipulation methods usually accept either a key-value pair or JS object (dict)
The jQuery selector methods methods usually return a list of jQuery objects so when using a get method this usually operates only on the first element of that list and a set method usually operates on all the matched/selected elements
style -> .css method:
- We use the
.css(property, value) method e.x. $(#myid).css("color", "yellow")
.css({...}) It's also common to pass a JS object with the key-value pairs of the styles to be changed. CamelCase is needed for the name of the properties- the
.css returns a list so the styles can be applied to multiple elements at the same time
content -> .html and .text methods:
- Use
.text() to get the text contents of the selected element and all of its descendants and .text("new text") to update all the selected elements
- Use
.html() to get the html contents of the first matched element and .html("new html") to set contents of every matched element
attributes -> .attr():
- We use
.attr("attr_name") and attr("attr_name", "value") to get the attribute for the first matched element or to set attributes to every matched elements
input -> .val() method
- we use it to return and/or set the value of an (input) element
classes -> .addClass("className"), .removeClass("className") and .toggleClass("className") methods:
- we use them to add, remove and toggles classes to every matched elements
jQuery Events
$(this) returns the jQuery object referenced by this- Adding the
event object parameter to the callback in the events makes all the information of the event available in the callback .click(functio(event){...})
- The most common jQuery event methods are:
click(callback): used to add click listeners to one or more elementskeypress(callback), keyup(callback) and keydown(callback): used to add key press listeners to one or more elements.
keypress() gets you the end character result that is entered when pressing keys- JS Character Codes
on(type, callback) is the general jQuery method to add an event listener and it lets us specify the event type
jQuery Effects
- Fading and sliding are the most common (basic) jQuery effects
.fadeOut(duration, callback), .fadeIn(duration, callback) and .fadeToggle(duration, callback) on the selected element it animates a fade out/in, this means it makes it go from certain level of opacity to the other extreme of opacity.slideDown(duration, callback), .slideUp(duration, callback) and .slideToggle(duration, callback) it animates the hide of the selected element, this means it makes it go from certain level of opacity to the other extreme of opacity
Front End vs. Back End
- Front End or Client side: Stuff you see and interact with: HTML, CSS and JS
- Back End: or Server side: All the Stuff, all the SW, all the logic that we don't see and that runs on
the servers which is needed to return the right front-end, it constructs the HTML that is sent back to the user.
The back-end usually handles Database access, the logic to handle requests and logic to handle the information shared with the front-end
Web Application
The protocol used for Web communication is called HTTP (HyperText Transfer Protocol) which
defines a set of rules for how clients and servers communicate and transfer resources (HTML pages, CSS style sheets or data).
HTTP uses a set of methods (GET, POST, PUT, DELETE) that clients and servers use to communicate,
this is how a client specifies if its asking for data, providing data or deleting data then Servers send an HTTP responses
to clients after handling the requests appropriately. The response include a status and can include data or resources that were requested.
A web server handles requests for web content and serves the content to clients
An API is an interface that allows one software component to use or interact with another, a Web API is no different it's just
accessed over the web they are also sometimes referred as REST APIs or REST Services
JSON is a text-based data-interchange format used on the Web
Layers
The Presentation Layer refers to user interface of an application which includes all the HTML, CSS and JS code
needed to display and interact with the web application, basically it refers to the front-end
The Application layer refers to all the logic carried out in the background in order to handle the features of the application. Generally handled in the back-end
The Data Layer is the one that stores, organizes and manages access to an application's data using a database, also handled in the back-end
Architecture
With client-side rendering the JavaScript code running in the user's web browser is responsible for requesting data from the
server and manipulating the webpage as needed, with this approach the server server-side code will be primarily responsible with
providing access to data, not with rendering user-interface code
With server-side rendering the client requests a new webpage from the server for every update, and displays the page in the way it's received.
It is possible to use a combination of these approaches, using server-side code to render the initial page, and then updating it as needed with client-side code.
Node.js
- Node.js is a way to run JS code on the server side to perform the data access and manipulation
- Node.js is a server-side runtime environment that can be used to program web application servers
- Node Console: REPL (Read, Evaluate, Print, Loop) application console to execute NodeJS and JS code
NPM (Node Package Manager)
- Package manager for Node.js JavaScript libraries and apps which allows us to install and manage these dependencies for our Node.js projects
- On the JS server side we can't include JS libraries like in the front-end side using
<script> tags so we need NPM to install/include JS libraries (or packages)
- Common uses cases :
npm install <package_name> to install a package
- Modules are collections of functions that you can utilize in your Node.js application. We use
require() to add modules to our project, in other word to include a package in a JS file
- Every
npm package or project has a .json (package.json) file that contains all the metadata about a package (dependencies, name, author, license info, url, etc.)
- Creating an NPM app: we can just create a JS file but the best practice it to create a new NPM package
npm init is used to setup a Node.js project and uses the information from your package.json file to do so or creates a new package.json file if it doesn't exist- When installing packages used by our app the
--save flag is used to creates a dependency in the package.json
Express
- Lightweight Web development framework that helps build web apps and APIs with Node.js.
- It can be used to route HTTP requests that are made to your server, with Express, you can easily define routes that control how your server handles different types of requests.
- Routing refers to the process of defining how the app will respond to client requests to particular API endpoints.
- This process of simply returning files without modifying them is called serving static files, to do this we use
app.use(express.static('public'));. This means we'll keep our static HTML, CSS and JavaScript files for our front-end in a public folder on our server, and Express will simply return those files as-is when the browser requests them.
- Uses
.ejs (Embedded JavaScript) files to render html, which are templates to create parametrized html files
.ejs files must be in the views folder, express will look in this folder by default
- to add other folder we need to use the
app.use(express.static("path_to_folder")) method
- Express needs the
ejs package for this. Install: npm install ejs --save
- Uses
ejs brackets <%= %>/<% %> and everything inside these special brackets is treated as JavaScript
<%= %> whatever the code inside returns will be rendered and added to the html file<% %> code inside will just be evaluated as JS but NOT added to the html file
- Flow control and loops are supported to render html, so we use
<% %>
Routes
- Order of routes definition matters because for express the first route that matches a given request is the only one route it will be run
- Route parameters
Node.JS Setup a basic Web Server
- Install Node and run
node -v to check it was installed correctly
- Create a folder where you will store your new project files and navigate into
- Run
npm init you will be guided through a series of prompts to enter values for your project, you can press enter to use the default values
- Usually entry point is the only one renamed to
app.js or server.js
- Create a file in your project folder, where your
package.json file was created, and save it as server.js or whatever name you have as entry point.
- Add basic server code to your
server.js file. For example:
var http = require('http');
var port = 3000; // process.env.PORT;

var requestHandler = function(request, response){
    console.log('New request to: ' + request.url);
    response.end('Hello, World!');
};

var server = http.createServer(requestHandler);

server.listen(port, process.env.IP, function() {
//server.listen(port, function() {
    console.log('Listening on port ' + port);
});
- Run to test it, using
node server.js and open a browser in localhost:3000 or 127.0.0.1:3000 to test access to the server
The http module is a module that is built into Node.js. It allows HTTP communication with your Node.js server.
We need it to create o create a server that listens to http requests and provides http responses,
to create the server we use the createServer method from this module
Adding Express to the basic Web Server
- Install Express
npm install express --save
- Include Express (
var express = require('express');) and create an express app object var app = express(); and use this instead of the server object
- Define routes
var express = require('express');
var app = express();
var port = 3000; // process.env.PORT;

app.get('/', function(request, response){
    response.send('Hello, World!');
});

app.listen(port, process.env.IP, function() {
//app.listen(port, function() { // if you dont need to define a specific IP use this
    console.log('Listening on port ' + port);
});
Databases
A collection of information/data that has an specific interface to interact (add, remove, update, etc.) with the information
A database is an organized and structured collection of data that stores data as records, each record would have attributes that describe the item being stored and each attribute has a specific data type.
A query language is used to define instructions for creating, accessing and modifying data in a database, for example SQL (Structured Query Language).
A DBMS (DataBase Management System) is an application that allows you to interact with databases, for example SQL Server, SQLite and MySQL. You can interact with these DBMSs directly which is the common
use case when debugging or manually checking the database or you can write code in a server-side programming language to do this interaction, which is the comon use case
Associations: Refers to the idea to have associated data. Types: one:one, one:many and many:many
CRUD (Create, Read, Update, Destroy) basic expected functionality from a database interface.
CRUD app is a term used to refer to web application that support CRUD operations, this means it provides a way to perform
some set of CRUD operations on its data/resources (the resources of a webpage can be its users, posts, comments, etc.)
- Creating data: inputting/storing information (Create a post)
- Reading data: viewing/retrieving information (View details a post)
- Updating data: modifying information (Modify post)
- Deleting data: removing information (Delete post)
SQL
SQLite Setup
- Install SQLite:
sudo apt-get install sqlite3
- Move to the directory of your project and create a database file:
sqlite3 NewDatabase.db
- SQLite commands:
.table, .mode column .width 10
- SQLite Basic usage example
# create table
CREATE TABLE Contacts(
    id INTEGER PRIMARY KEY,
    FirstName VARCHAR(255),
    LastName VARCHAR(255),
    Age INTEGER,
    EmailAddress VARCHAR(255),
    PhoneNumber VARCHAR(255),
    ZipCode VARCHAR(255)
);

# insert record
INSERT INTO Contacts
    VALUES (12, 'John', 'Doe', 'JohnDoe@email.com`, '999-999-9999', '29384');

# omitting id
INSERT INTO Contacts (FirstName, LastName, EmailAddress, PhoneNumber, ZipCode) VALUES ('Thomas', 'Axen', 'taxen@email.com', '111-111-1111', '90110');

# select all data from table
SELECT * FROM Contacts;

# select specific columns
SELECT FirstName FROM Contacts;
SELECT FirstName, LastName FROM Contacts;

# select conditionally
SELECT * FROM Contacts WHERE FirstName = 'Roya';
SELECT FirstName FROM Contacts WHERE id <= 4
SELECT * FROM Contacts WHERE id <= 4 AND ZipCode = '90210';

# ordering
SELECT * FROM Contacts ORDER BY id DESC
SELECT FirstName FROM Contacts ORDER BY id DESC;

# update single record
UPDATE Contacts SET ZipCode = '33333' WHERE ID = 3;
UPDATE Contacts SET LastName = 'Smith', ZipCode = '44444' WHERE ID = 4;

# update multiple records
UPDATE Contacts SET ZipCode = '22222' WHERE ZipCode = '90210';

# update all records
UPDATE Contacts SET ZipCode = '00000';

# delete single record
DELETE FROM Contacts WHERE ID = 5;
DELETE FROM Contacts WHERE FirstName = 'Kim'

# delete multiple records
DELETE FROM Contacts WHERE ZipCode = '90210';

# delete table
DELETE TABLE Contacts;
DROP TABLE Contacts
SQLite will automatically provide an auto-incrementing, primary key attribute named rowid when you create a new table
SQLite Node.js Setup
- Install sqlite3 package in your node project:
npm install sqlite3 --save
- To use it you will need to include the module in your Node.js project
var sqlite3 = require('sqlite3'); and create a database object to connect and access the database var db = new sqlite3.Database('myDatabase.db');
var sqlite3 = require('sqlite3');
var db = new sqlite3.Database('myDatabase.db'); // you can also use ':memory:' as parameter to use an in-memory temporary database

db.serialize(function(){
    // To run the appropriate INSERT, UPDATE or DELETE SQL statement use run()
    //create table
    db.run('CREATE TABLE Contacts (first_name TEXT, last_name TEXT, age INTEGER)');

    //insert values
    db.run('INSERT INTO Contacts VALUES ("John", "Doe", 25)');

    // For SQL SELECT queries use all(), each(), or get()
    // The all() method allows you to run a SQL query and provide a callback function that processes the resulting set of rows.
    db.all('SELECT * FROM Contacts', processRows);

    // The each() method allows you to run a SQL query and provide a callback function that processes one row at a time
    db.each('SELECT * FROM Contacts', processRow);

    // The get() method allows you to run a SQL query and provide a callback function that processes the first resulting row
    var firstName = 'John';
    db.get('SELECT * FROM Contacts WHERE first_name = ?', [firstName], processRow);

});

function processRows(err, rows){
  if(err) {
    console.log("ERROR: " + err.message);
  }
  else {
    for(var i = 0; i < rows.length; i++){
      console.log(rows[i].name);
    }
  }
}

function processRow(err, row){
    if(err) {
        console.log("ERROR: " + err.message);
    }
    else {
        console.log(row.name);
    }
}

db.close();
SQL (relational) vs NoSQL (non-relational)
- In relational database tables, it's important that each record can be uniquely identified in some way. One or more columns in the table is used as the unique identifier, known as the primary key. If a column is denoted as the primary key for a table, that means that no 2 records in the table can have the same value in that column.
- Relational databases utilize a table format for organizing data, it can consist of multiple tables, where each table represents a single entity or resource type and make it possible to specify relationships between data elements
- SQL databases are tabular and flat because we need to define exact patterns that all elements in a certain table must follow (table with defined columns)
- NoSQL databases they have flexible patterns, they don't have tables and they can have nested information (BSON dictionary with nested elements)
MongoDB
REST (Representational State Transfer) / RESTful Routing
REST Services are a category of APIs that are available on the Web, and are accessed using HTTP requests (GET, POST, PUT, DELETE)
In a RESTful system, all data is represented in terms of resources. REST revolves around the idea of resources and performing actions on those resources.
Paradigm to structure a web page
A pattern/convention to define web page routes
It's a SW architecture to map or establish a relationship between HTTP routes and CRUD operations
| Mongoose |
CRUD Op |
REST Op |
URL |
Method |
Description/Purpose |
| .find() |
READ |
INDEX |
/url |
GET |
display in general all resources |
| - |
CREATE |
NEW |
/url/new |
GET |
display a form to create a resource |
| .create() |
CREATE |
CREATE |
/url |
POST |
creates a resource then redirect |
| .findById() |
READ |
SHOW |
/url/:id |
GET |
shows info about a resource with identifier :id |
| .findById() |
UPDATE |
EDIT |
/url/:id/edit |
GET |
display a form to edit resource with identifier :id |
| .findByIdAndUpdate() |
UPDATE |
UPDATE |
/url/:id |
PUT |
update resource with identifier :id then redirect |
| .findByIdAndRemove() |
DESTROY |
DESTROY |
/url/:id |
DELETE |
delete resource with identifier :id then redirect |
Auth
http is a stateless protocol, request do not contain information about your history (if you had previously accessed the page) or the previous request that you have made
requests don't have states
Sessions: are the way we make HTTP not-stateless, they are the way we provide state to HTTP requests, provide a secret key/hash information that identifies the user
Headers are also involved in male HTTP not-stateless, a header is essentially the same as form data or just in data as just some more data included but instead of being in the form section or the JSON payload section and it goes in the headers section
npm install passport passport-local passport-local-mongoose express-session
References
Terms
- Module design pattern: the one that relies on the use of classes and objects to encapsulate functionality and variables
- Framework:
- they are re libraries that applies inversion of control on your application that means they are actually in control of your app
- you align to their rules, the control flow is in the framework and they have predefined spaces that you can actually fill with your code
- abstracts a lot of setup an common functionality
- A library is a collection of functionality that you can call and use while still being in control of all the flows of the program
keyword this
- Determined by its execution context (how a function is called)
- Execution contexts in JS:
- Global: when
this is NOT inside of a declared object it refers to the global object, in the browser is the window
- Every variable you declare in the global scope is attached to the global object (the window in a browser)
- Implicit/Object: when
this IS inside of a declared object it refers to the closest parent object
- Explicit Binding: we use
call, apply and bind to choose what we want the context of this to be, these methods are applied to functions
- New:
this refers to the new object created
- The
new keyword is used to create a new object from a function
- When the
new keyword is used and implicit return this is added to the function used to construct an object
JS OOP
JS does not have built-in support for OOP or classes so JS mimics this through constructors (functions) and the use of new
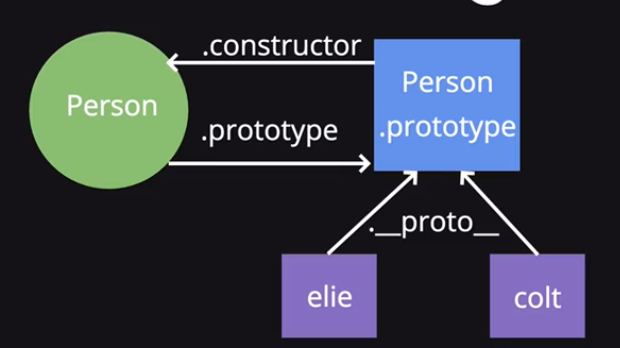
new keyword
- used with a function (a constructor) to create objects
- creates an empty object and sets
this to be that empty object
- add an implicit
return this to the end of the function (constructor) used with new
- adds the
__proto__ property, which is the link between the created object and the prototype property which is stored in the constructor function is an object that is shared among instances/objects of this 'class')
Inheritance can be implemented using call or apply, we use these functions to simulate the call to the base/parent constructor
function Vehicle(make, model, year, wheels) {
    this.make = make;
    this.model = model;
    this.year = year;
    this.wheels = wheels

    this.isOn = false;

    // this is an object method, every instances has his own copy
    this.move = function () {
        console.log(this.make + " " + this.model + " has moved");
    }
}

// these are class methods which are stored in the property object
Vehicle.prototype.turnOn = function() {
    this.isOn = true;
}

Vehicle.prototype.turnOff = function() {
    this.isOn = false;
}

Vehicle.prototype.turnOff = function() {
    if (this.isOn) {
        console.log("Beep");
    }
}

function Car(make, model, year) {
    // equivalents

    //Vehicle.call(this, make, model, year, 4);
    //Vehicle.apply(this, [make, model, year,  4]);
    Vehicle.apply(this, arguments); this.wheels = 4;
}

var myCar = new Car("My Car", "Aveo", "2014")
Closures
- Function that uses variables defined in outer functions that have previously returned
- Use variables in an outer function inside inner functions (the inner function is also called a closure)
- Closures are used to mimic private variables